Achieving goals and causing the shift to P2P sovereignty on your development journey on Nostr requires a solid understanding of its foundations, suitable tools, and the right environment. These sentiments will help you traverse the landscape of Nostr development, from setting up your environment to creating your first Nostr account.
Understanding the Basics of Nostr
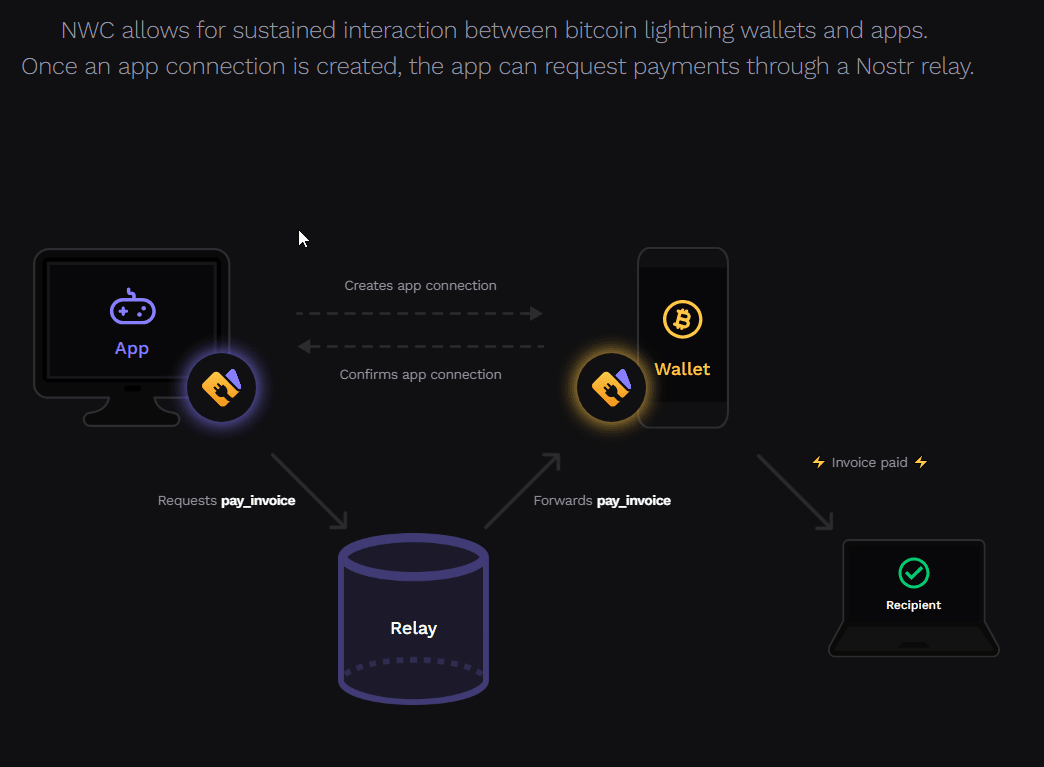
Nostr operates atop the Lightning Network, utilizing it as the backbone for transactions on the Bitcoin blockchain. It leverages a peer-to-peer network for content distribution, eliminating any central authority's control over information flow.
Choose Your Programming Language
Nostr supports several programming languages, each with libraries and tools tailored for Nostr development:
- Python: Popular for its simplicity and readability.
- JavaScript: Widely used for web applications.
- Rust: Known for its performance and safety features.
Choose a language that you are comfortable with and that offers robust support for developing on Nostr.
Setting Up a Nostr Development Environment
To commence development, you'll need a comprehensive setup that includes various components:
- Nostr Desktop Client: The interface for your Nostr operations.
- Lightning Network Node: Essential for handling transactions.
- Relay: Facilitates communication within the Nostr network.
- Database: For storing data locally.
Tools to assist in setting up your development environment include:
- Nostr CLI: A command-line tool for managing your Nostr configurations.
- Nostr Docker Image: Provides an easy-to-deploy Nostr relay server.
Connecting to the Nostr Network
With your development environment ready, connect to the Nostr network by executing the Nostr CLI. This connection links your Nostr node to the wider network, allowing engagement with other nodes and clients.
Creating a Nostr Account
Creating a Nostr account involves generating a new public/private key pair. Use the Nostr CLI or a hardware wallet for key generation:
- Generate Key Pair: Securely create your public and private keys.
- Register Account: Use your public key to register your Nostr account.
Funding Your Nostr Account
To activate and use your Nostr account, you'll need to fund it with Bitcoin:
- Obtain Bitcoin Address: Retrieve your Nostr account's public key lightning address.
- Transfer Funds: Using a Bitcoin wallet or exchange, transfer Bitcoin to the obtained address.
Start Developing
With your account set up and funded, you're now ready to start developing on Nostr. Begin by exploring simple projects to familiarize yourself with the network’s capabilities and gradually transition to more complex applications.
Consider Your Services, Stand Up
Developing on Nostr opens up vast opportunities in P2P applications leveraging the Bitcoin blockchain. By following these sentiments, setting up your environment, and connecting to the network, you’re well on your way to becoming an adept Nostr developer. Embrace the journey, and leverage the power of open, decentralized networks to build innovative solutions.
Remember, the path to mastering Nostr development is continuous learning and experimentation. Engage with the community, search out new pubkeys, contribute to open-source projects, and stay updated on the latest Nostr developments for a fruitful development experience.


